Show Casing Market Stalls for an Event Using Vantage
For most cities and towns, generally one market a month is organised for locals to showcase their best produce, arts and crafts as well as homemade wares. These markets give an opportunity for buyers to interact with local sellers in an attempt to encourage the local economy. While in previous years, the market holders would advertise on billboards and hand-made signage, in more recent times advertising through social media channels and websites has become more prominent. In fact, even so, many of the market organizers even have their own websites where they advertise which stall holders will be attending certain markets as well as an outlet for new stall holders to apply with the organizers.
Vantage, one of the well-known AppThemes allows you to create a business directory. This makes Vantage an ideal theme for market organizers as this allows them to easily set up a WordPress website and begin data entry of each stall that can be found at a specific location. As many of the stall holders will be unable to afford their own website, the exposure on the main markets website will allow them to get their name across to a variety of users. The admin of the website can decided whether they will list the stalls themselves or allow the stall holders to create their own listings.
Why is Vantage a Suitable Theme for a Market Stall Directory Website?
- It gives admin the ability to create custom fields that each stall holder can be required to answer prior to making a payment
- It allows for hundreds upon hundreds of stall holder entries
- It is an automated system that takes stress away from market organizers
- Vantage allows all market stall payments to be handled online and reduces stress on the day of the market
- If an email address is collected, market operators can contact with the stall owner and let them know where they will be situated prior to the market commencing
- The blog can be used to notify market stall operators of any changes, weather conditions or deals
- The website can encourage more visitors to attend the market if they are interested in checking out one or more stalls that are advertised to be there
- A Vantage website allows admin to create blog posts about having a market stall which may lead to interest from new stall holders
To complete the following tutorial you will need the Vantage AppTheme which can be purchased from here.
Customizing Vantage for Your Market Directory Website
Each AppTheme comes with it’s own customization tools and Vantage is no exception. Customization of the Vantage theme can be completed with the click of a few buttons. To customize the Vantage theme to suit a market directory complete the following:
- Within your WordPress Dashboard ensure you have the ‘Vantage‘ AppTheme ‘Installed and Activated‘.
- Click on the WP ‘Appearance‘ menu and then on ‘Customize‘.
- This will bring you to the Vantage customizer which allows you to make a number of appearance changes.
- Click on ‘Site Identity‘. Add a ‘Logo‘, ‘Site Title‘, ‘Tagline’, ‘Footer Copyright‘ and ‘Site Icon‘.
- Click the ‘Publish‘ button to implement the changes.
- Click on ‘Colors‘. Choose a color scheme for your website.
- Click ‘Publish‘ to implement the color scheme.
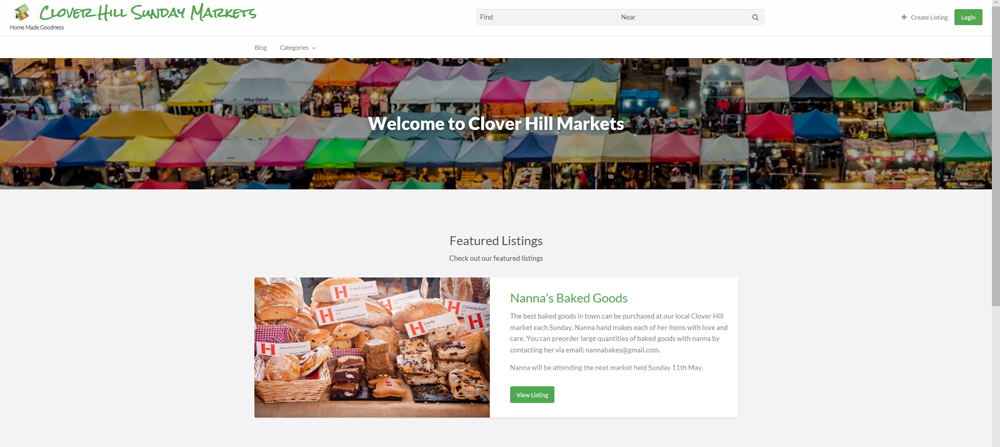
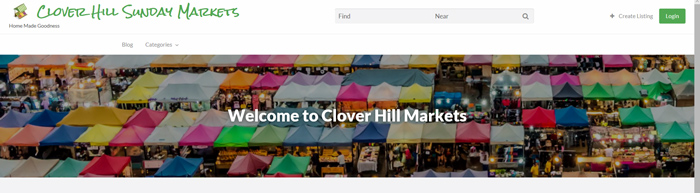
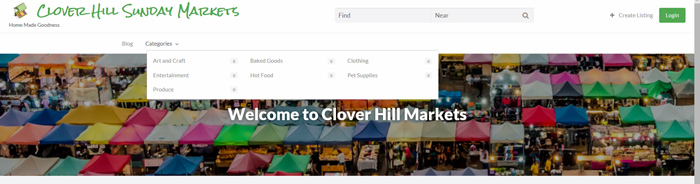
By default the Vantage theme includes a large area at the top of the homepage where an image can be displayed. The image should relate to the purpose of the website. For instance, it may be a birds eye view image of the market you are creating the website for.
To edit the image displayed on the homepage complete the following:
- Click on the ‘Pages‘ menu from your WordPress dashboard.
- Click on the page titled ‘Home – Front Page‘.
- On the right-hand side, replace the ‘Featured Image‘ with a large image of your choosing. For the best results, ensure you choose a high definition image.
- You may also choose to give the homepage a new title. Simply edit the title of that page. For instance, ours will be ‘Welcome to Clover Hill Markets‘
- Click the ‘Update‘ button to implement the featured image.
- Go to the front end of your website to view the custom changes you have made.
Find out more on customizing Vantage here.
Now that we have customized the website to better suit the intended use, it is time to create market stall categories.
Market Directory Listing Categories and Tags
The categories and tags that you create within Vantage should relate to the type of ads that you will post or potential outside users could post. If you are creating a market stall directory some ‘Categories‘ that you may create could include (although are not limited to) the following:
- Baked Goods
- Hot Food
- Art and Craft
- Pet Supplies
- Produce
- Entertainment
- Clothing
To create categories, complete the following:
- Within your WordPress dashboard click on the ‘Listings‘ menu and then on ‘Categories‘.
- Add the ‘Name‘ of your category in the appropriate field.
- Click the ‘Add New Listing Category‘.
More information on adding Vantage Categories and Tags can be found here.
Now that you have created categories, all that is left to do is to create pricing plans and then advertise your new website to potential stall holders.
Using a Pricing Plan as a Means of Collecting Stall Payment
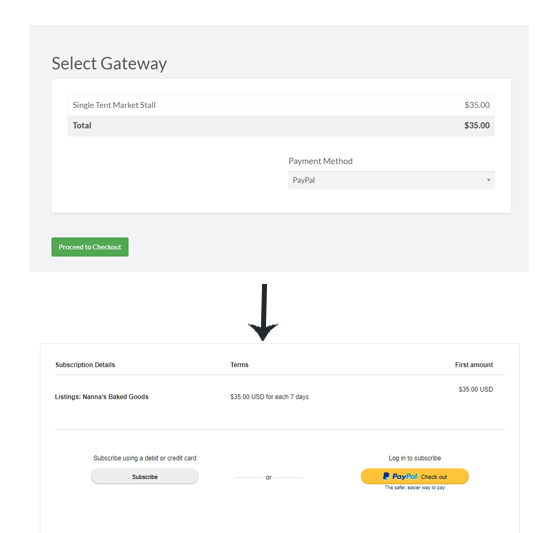
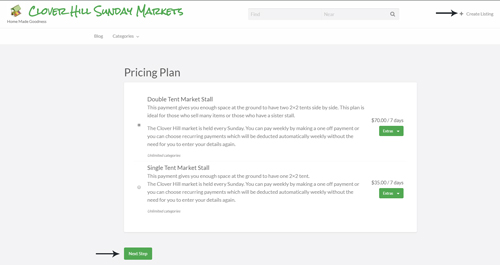
While the pricing plan is often used in terms of where the business listing will be located on the website, if you intend on using Vantage for a market directory, the pricing plan can be used as a means of collecting payments from stall holders to have their spot at a venue. If there are prime spots at the venue that the stall holder must pay more for, the package could even include further exposure on your website. The beauty of Vantage is that you can create a number of pricing plans so that your market holders can select a package that is right for them. In the example screenshot below, two different pricing plans were created. One plan is suitable for vendors with one market tent while the other is suitable for vendors with two market tents.
If you have regular stall holders, you may even choose to do a subscription style pricing plan so that they are billed weekly/monthly a set market stall fee.
Prior to creating pricing plans, you’ll need to ensure that you have complete the basic set up of Vantage. You will need to ensure you have enabled one type of payment method from the ‘Payment Settings‘ menu. PayPal is among the easiest gateway to install.
To create your first pricing plan, complete the following:
- Click on the ‘Payments‘ menu in your WordPress dashboard and then click on ‘Listing Plans‘ and ‘Add New‘.
- Give your listing plan a ‘Title‘, ‘Description‘ and ‘Price‘.
- Choose whether this plan will be recurring or not.
- Choose how long the plan will last and choose whether the advertisement will be listed on the homepage of the website. If you are mainly using Vantage to collect a payment you may not wish to feature the adds on the homepage or you may only wish to feature the adds for superior listing plans.
- Click the ‘Publish‘ button to add the listing plan.
Learn more about Vantage Pricing Plans here.

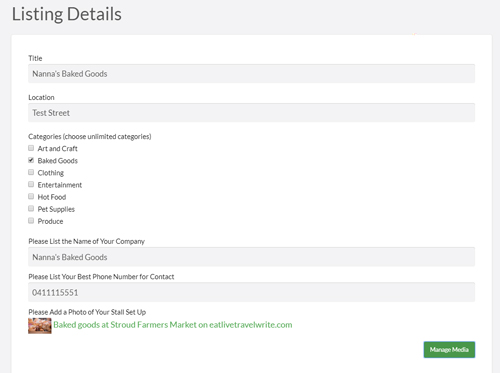
Now that you have created a listing plan, it is important to edit your form to ensure you collect enough data from stall holders so that you can create a directory listing for them on the website (this is completed automatically after a successful payment).
Custom Fields for Market Directory
Depending on what data you wish to collect about each stall holder, the ability to add custom fields allows you to do so.
- Click on the ‘Forms‘ menu and then on ‘Add New‘.
- This will allow you to create a custom form with custom fields.
- You can use the ‘Form Builder‘ to add in different types of fields.
- Ensure you give your form a ‘Title‘.
- For each field that you add, you can choose to make it ‘Required‘ or ‘Not Required‘. If the information is vital, then ensure you make the field required.
- Ensure you apply the fields to the listing categories that will need to answer the questions.
Once a user creates a listing, if they click on a category where the custom form has been applied, they will see the fields you have created. If you have marked certain fields as required, then your customer will need to supply an answer prior to moving on.
How Will the Stall Holders Pay for their Ground Location and Advertisement
Once your stall holders come to your website and create a listing, they will be asked to choose from your pricing plan, then asked to fill in the required fields to create the directory listing and then the third step will involve them needing to make a payment through your desired payment gateway. In the case of the screenshot below, PayPal has been enabled.
The way in which the following pricing plan has been set up gives the stall holder the option to make a one off payment for a one week stall pass or sign up for recurring payments so that they do not need to re-enter payment details the following weeks. This is a seamless process for the stall holder and allows admin to sit back without needing to do much more than ensure the stall holders know where they are situated on market day.