
ClassiPress Child Theme Tutorial (Part 1)
Yes, its finally here. I know you all have been anxiously awaiting some guidance on creating a child theme. This first part of the tutorial will cover the basics. I’m going to try to assume you know absolutely nothing about WordPress or child themes.
It will however, require that you understand some simple things like how to FTP to your server, browse the file structure, and upload/download files to your WordPress installation.
Step 1: Creating the Folder and Stylesheet Files
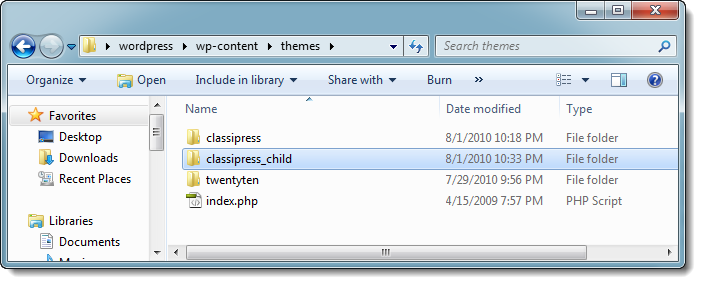
What I have to show you here is that I’ve downloaded the most recent version of WordPress, at the time of writing this article. Then I’ve placed the folder on my desktop and navigated to the “themes” directory. I’ve also already copied my “ClassiPress” theme folder that I purchased into this folder.
Next we want to create our “CHILD THEME” folder. For this example lets use “classipress_child”. So create a new folder with this name in the “themes folder”. When you have completed this, your file navigator should look something like this.
Now lets open up our “classipress_child” folder and create the first and only required file. The file is called “style.css”. Modify that file, adding following code:
/*

Theme Name: ClassiPress - Child Theme

Theme URI: http://appthemes.com/

Description: Child Theme for ClassiPress

Author: Seth Carstens

Author URI: http://sethcarstens.com/

Template: classipress

Version: 3.0.3

*/
@import url("../classipress/style.css");
@import url("../classipress/styles/red.css");
You can replace the author information with your own information, but keep in mind after you activate this theme, you won’t want to modify any of this information as it could disable the child theme or give you a temporary error. You will also notice the import after the comments. This is to include all of the original styles in the child theme. You do NOT have to do this, but for the simplicity of what we are doing here, I’m going to import all the original styles.
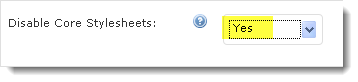
EDIT: Please note we added the red.css import above. You will also need to “Disable Core Stylesheets” from the ClassiPress settings page:
Step 2: Basic Changes Using the Stylesheet
Now we are going to make some basic changes to the stylesheet. Lets use the following code which is going to change the entire page to a very “dark” website. Simply copy and paste this code BELOW all rest of the code on the “style.css” page, thus appending it to the file.
body, .content, .content_botbg, .header_main_bg, .header_menu, #nav li { background: #000 none; border-top: none; }
Step 3: Upload and Activate
The last thing you are going to do is upload your child theme. You need to have a basic understanding of FTP in order to transfer your child theme folder into your themes folder on the server. When you are done, you will see both the “classipress” and “classipress_child” folders in the wordPress themes folder. This folder on the server is typically located at “/public_html/wp-content/themes/”.
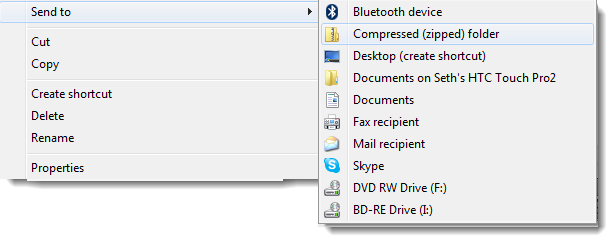
Another option is to use the wordpress wp-admin pages to upload your child theme, but it is not encouraged or recommended if you plan to modify your files often. To do this you simply “ZIP” your entire “classipress_child” theme folder into a zip file. Typically on Windows, you right click on the folder -> Hover over the “send to” menu and then select “Compressed (zipped) folder” as shown here.
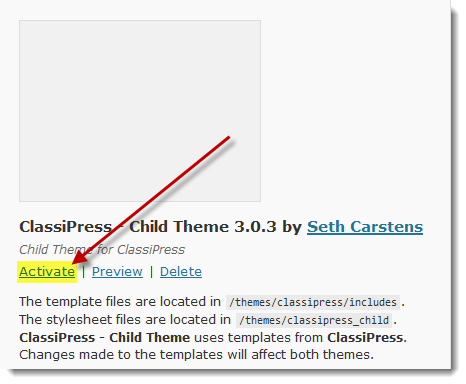
Once you have used the “Appearance -> Theme Upload” tool or FTP to upload the new child theme we created, we now need to activate the child theme. If you have followed the directions here correctly you will see the child theme when you click on the WordPress Admin -> Appearance. You will then activate the child theme as shown.
Congratulations! You have just created your first ClassiPress child theme! At the very least you now have complete control over all the style elements of ClassiPress which can be easily “undone” just by activating the original ClassiPress theme again. Here is a preview of what the tutorial creates (click to zoom):
 This concludes Part 1 of the child theme tutorial. Now you may be ready to venture deeper into the child themes by visiting Part 2 of the series which will explain how to use the functions.php file and how it will help you modify the functionality of your theme.
Comments (31)
“Another option is to use the wordpress wp-admin pages to upload your child theme, but it is not encouraged or recommended if you plan to modify your files often.”
Can you kindly elaborate what you mean? I never know there is any difference between FTP and that of installing direct from the wordpress wp-admin panel.
I’m not sure how the theme uploads react to “overwriting” theme files when uploaded through the wp-admin panel. Also if you have 15 files in your child theme, no reason to upload all 15 files after making 1 change to 1 file, makes more sense to know how to use FTP at that point. These are the only reasons I don’t recommend it.
So far so good, and when is part 2 coming?
Gasp! Just finished this one, maybe early next week.
How about bigger screenshots? What you attached is so tiny you cannot see what you actually did, especially the 2nd one showing the whole site.
thanks
Did you try clicking on the images? They get larger.
Seth,
I did click on them. The last screenshot showing the entire website is absolutely tiny. You cannot see any details or what you actually did to it.
thanks
It’s unfortunate how limited the options actually are for retheming classipress without making changes to the initial classipress. It’s clearly not designed for retheming by anyone with more than a rudimentary knowledge of CSS. In my opinion a theme that is actually designed to have child themes should be built on a proper grid system like the 960 grid system and be filled with appropriate action hooks so one can really customize the theme via the functions file. For instance the thematic framework is loaded with action hooks in appropriate places. I was particularly not happy to discover that many things that should be widgets aren’t widgets. While classipress is great if all you know if CSS it’s not really flexible enough for those who want to do more. Instead here I am making a reference file with all the action hooks I added so I can add them in again if my client upgrades.
I’m sorry that you don’t seem to like the extensibility of ClassiPress. We are working hard towards making it more “developer friendly” as you can see by this post.
I’m not sure I understand your complaint about the CSS 960 grid system… you could very easily follow this tutorial to overwrite all the CSS with the grid system and customize to your hearts content!?
We haven’t yet claimed that ClassiPress was the 100% perfect, nor does it say “this product is every developers dream”. Its simply the best product on the market to extend WordPress into a Classifieds system. We hope the community members continue to provide valuable positive criticism so that we can continue to be the leading provider of “AppThemes” for WordPress.
Thanks Seth,
For the great tutorial… I look forward to part 2..
Not too sure about what “Stephen” was complaining about? But as a newb I appreciate all the hard work CP Developers have done and continue to do for us..:)
I have heavily modified my site by following many of the helpful advice that you and all the CP community provide…
Thanks, I’m glad some members of the community found the information helpfull on extending there product.
Also I’m anticipating having another tutorial up in the next week or so now that 3.0.4 is ready to go (in case you haven’t seen the blog post, check it out!)
So heads up that next week we will continue the series by talking about overwriting some classipress functions with the functions file and also integrating some new javavscript using the child theme.
Great tutorial. Thumbs up.
Any news on the much anticipated ‘part two’ ?
Its done. http://appthemes.com/blog/classipress-child-theme-tutorial-part-2/
What if we want to make changes to one of the color scheme css files such as “blue.css”? Can we use a single “style.css” stylesheet within our child theme that will overwrite anything within the default classipress style.css and blue.css files?
If yes, do we just call in “blue.css” like we did style.css?
So the best way to do that is to use the ClassiPress settings to “Disable Core Stylesheets:” by setting the option to ‘Yes’. Then you can copy “blue.css” and paste it into your child theme CSS stylesheet, modifying any of the values to properly reflect the styles you want loaded.
Hope that makes sense.
Your attempt to switch to this theme: “classipress-mod\\” has failed.
Please try again.
Not working! i tried it as classipress then tried it as child then mod. not working.. it is only one stylesheet file right?
contents of it:
/*
Theme Name: ClassiPress – Child Theme
Theme URI: http://appthemes.com/
Description: Child Theme for ClassiPress
Author: John
Author URI: http://xxx
Template: classipress-mod
Version: 3.0.3
*/
@import url(“../classipress/style.css”);
body, .content, .content_botbg, .header_main_bg, .header_menu, #nav li { background: #000 none !important; border-top: none !important; }
You are not supposed to change the “Template” name. And you also HAVE to have the original “classipress” theme and folder installed on your blog (but not necessarily activated).
[…] can create a child theme, which has its own CSS document. You do not have to worry about your files upon upgrade, and will […]
I’ve done a lot of child theme development over the last two years. In all cases there was no need to add the !important declaration to all my CSS properties. The idea of a child theme is that it overrides the parent theme’s style.css by default.
My child theme’s style.css is harder to maintain this way and I’ve always thought that using !important was bad practice.
using !important is not bad practice, however you are correct that there was a small oversite in the order of which the stylesheets are loaded. I’ll modify the tutorial later, but basically you “Disable Core Styleshseets” using ClassiPress settings page, and then important the “red.css” or whichever color you wish to start with into your child theme stylesheet. You can now create styles without using !important.
I have a question about this screenshot: http://appthemes.com/wp-content/uploads/2010/08/cp-childtheme-3.png
It says, “The template files are located in /themes/classipress/includes .”
I followed your instructions exactly and mine says, “The template files are located in /themes/classipress .”
Why was *includes* omitted?
honestly I’m not sure why it would be different for you, are you actually experiencing any problems besides that it doesn’t match my folder structure exactly?
Please note that I modified the tutorial slightly to work more efficiently based on some of the good criticism received on the tutorial. Thanks for your input guys! Note the differences in steps 1 and 2.
Can anyone elaborate the benefits of child/parent theme combo kind of architecture.
TIA
upgrading versions of classipress while keeping your mods in tact becomes less of a challenge.
Is there any advantage to disabling the core stylesheet and importing it into the child theme’s stylesheet?
Yes, you need to do this in order for your NEW STYLES to be called last. Otherwise the “red.css” for example will overwrite any of the syles in your child theme stylesheet.
Here’s a strange problem to figure out because I’m at a total loss. I did this tutorial on a brand new site. The imported stylesheets would not load. I even copied and pasted your code to make sure I hadn’t mis-typed. Nothing I did worked.
@import url(“../classipress/style.css”);
@import url(“../classipress/styles/red.css”);
The solution:
@import url(“/wp-content/themes/classipress/style.css”);
@import url(“/wp-content/themes/classipress/styles/red.css”);
What could possibly have happened that it now requires the full directory path?
I’m guessing the location of you parent and child themes. But this issue is related to your setup specifically, I am glad you have it fixed but I’m not sure this is the appropriate forum for discussion of “relative pathing issues”.
The parent and child themes are in the exact locations that I’ve put them when completing this tutorial for two other sites, hence the reason I have posted it here.
I would suggest your post your issue in the support forums so that one of our moderators can assist you further. If they can’t help you they will likely message me and I can assist you privately (as I won’t be posting my email address here on the live public site).
Discussion is closed.