Before attempting this tutorial, you should have already read and completed the “ClassiPress Child Theme Tutorial Part 1“. Assuming you have done this you will already have a folder for your child theme which leaves us right where we left off.
What we will Cover in Part 2
- Creating the functions.php file.
- Overwriting an existing function (the prices function in this tutorial).
- Creating your own new function in the function file.
- Use the child theme to modify the index-directory.php file so that our homepage is modded.
- Build a new dashboard template to show confirmation messages and activate it.
Step 1: Creating the functions.php file
Navigate to the child theme folder you previously created. Now we need to create a new file in it. You can do this a variety of ways, but we are going to use a technique that is the most “universal”.
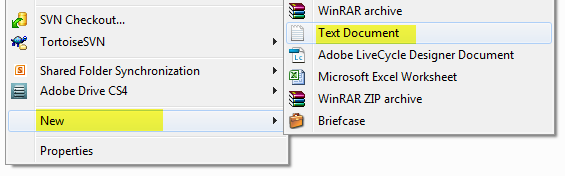
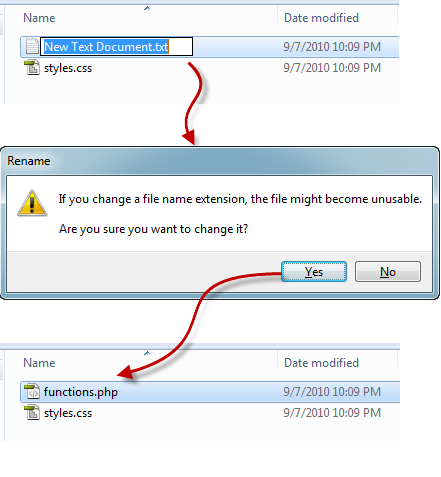
Open your child theme directory, right-click, and choose “New->Text Document”.
Now name the document functions.php making sure the click YES to the prompt that asks if you would like to change the file extension.
You have now created your child themes functions file and are ready to move on to step 2.
Step 2: Overwriting an existing function
Open your functions.php file in a text editor program (notepad, notepad+, Textpad, Dreamweaver, etc). Next we need to prepare the file for PHP code so copy the following code and paste it into the file:
<?php
/**
 * Write your own functions or modify functions, actions, and filters using this file.
 * LIST YOUR FUNCTIONS (optional):
 * cp_import_wp_childstyle() [CUSTOM]
 * cp_get_price() [OVERWRITE]
 */

//Place All Your Custom Function Below This Line

//Do not place any code below this line.
?>
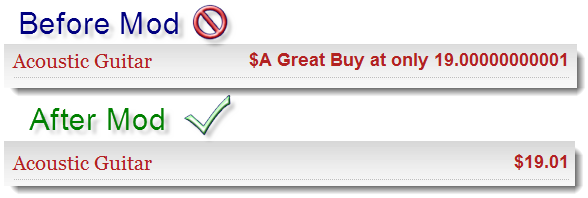
For this tutorial we are providing you with a function that will enforce good currency formatting based on USD (United States Dollars Currency). Before we have you implement this function we want to get a sample ad setup with “bad currency formatting” that we want to block from being displayed.
So now lets create a new “ad listing” by clicking on the “Post an Ad” link. You can put whatever you want in all the required fields, but please make sure you place the following text in the “PRICE” field:
A Great Buy at only 19.00000000001
You will notice after viewing the post that it will actually print out all that jumbo the user puts in. Our new function will correct that problem by pulling the price out of all that text and just displaying it with the proper USD currency setup. You could obviously modify this function to do whatever you wanted, but for the purpose of this tutorial we will be providing a simple example of what many of the US customers are using.
Now we are ready to setup the new function, so copy this function code into your functions.php file (between the comments in the file that tell you exactly where to place the code):
//change price to spit out correct looking currency and ignore anything that's not a price.
function cp_get_price($postid) {
	if(get_post_meta($postid, 'cp_price', true)) {
		$price_out = get_post_meta($postid, 'cp_price', true);

		// uncomment the line below to change price format
		$price_out =  ereg_replace("[^0-9.]", "", $price_out);
		$price_out = number_format($price_out, 2, '.', ',');
		$price_out = cp_pos_currency($price_out);
	} else {
		if( get_option('cp_force_zeroprice') == 'yes' )
			$price_out = cp_pos_currency(0);
		else
			$price_out = ' ';
	}
	echo $price_out;
}
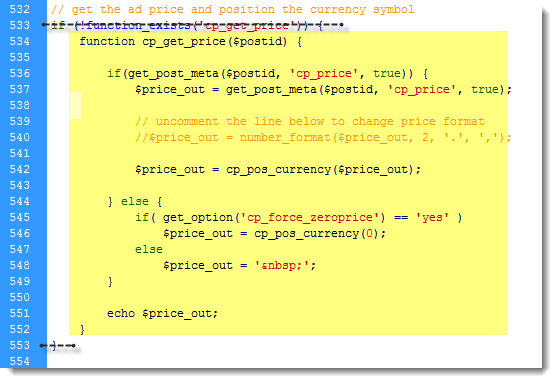
Now you might be asking, how in the world did you get all that code? The answer is simple. To modify an “existing function” you simply find the function you want to overwrite by searching through all the theme files (should be a feature of your text editor). Then copy the function and paste it into your function.php file. You should note that you DO NOT want to copy the if(!function_exists(‘#####’)), instead only copy the function on the inside (see screenshot).
Okay. Now you should have a functions.php file with a function in it (the one from above) which should correct the pricing issue we created in the sample ad we listed. Upload your functions.php file to your child theme directory and then visit the page. You will notice that it no longer displays all the junk in the price, instead it only shows the price, organized and perfect like we wanted it. Congratulations! You have just made your first ClassiPress mod using a child theme!
Step 3: Creating your own new function in the function file
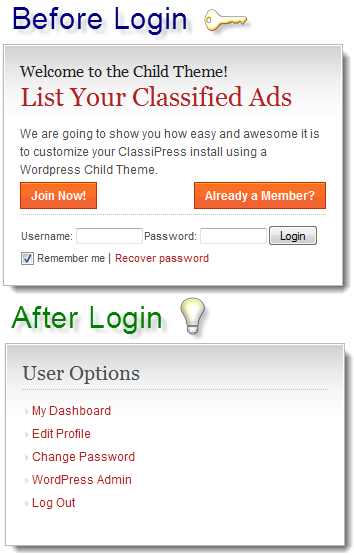
Next we want to write the new function… or copy and paste a function we want to use, depending on your level of PHP experience. I have had a ton of requests for the “login on homepage panel” so I decided to give this mod away in this tutorial. Its especially usefull because it “dynamically” displays new information after you are logged in. Copy this code, add a few lines of space below the previous function and paste it in (sorry its a long one, but I really think you will like it):
/**
 * HOMEPAGE DYNAMIC SIDEBAR LOGIN/REGISTRATION  : here we are updating the home page sidebar
 * to have a login form and display user options when logged in. Already enabled in child theme.
 * USE: I suggest you replace the get_option('cp_ads_welcome_msg') on sidebar.php with our new
 * function here <?php echo cp_dynamic_get_option('cp_ads_welcome_msg'); ?>.
 */

function cp_dynamic_welcome_widget($optionString) {
 global $user_ID, $user_identity, $user_level;
 if(!isset($optionString)) $optionString = 'cp_ads_welcome_msg';
 if ( $user_ID ) {
 $smHomepageSidebar = '<h2>User Options</h2>';
 $smHomepageSidebar .= '<div>';
 $smHomepageSidebar .= '<ul>';
 $smHomepageSidebar .= '<li><a href="' . CP_DASHBOARD_URL . '">' . __('My Dashboard','cp') . '</a></li>' ;
 $smHomepageSidebar .= '<li><a href="' . CP_PROFILE_URL . '">' . __('Edit Profile','cp') . '</a></li>';
 $smHomepageSidebar .= '<li><a href="' . CP_PROFILE_URL . 'change_password/">' . __('Change Password','cp') . '</a></li>';
 if (current_user_can('manage_options'))
 $smHomepageSidebar .= '<li><a href="' . get_option('home') . '/wp-admin/">' . __('WordPress Admin','cp') . '</a></li>';
 $smHomepageSidebar .= '<li><a href="' . wp_logout_url() . '">' . __('Log Out','cp') . '</a></li>';
 $smHomepageSidebar .= '</ul>';
 $smHomepageSidebar .= '</div><!-- /recordfromblog -->';
 }
 else {    //if the user has no user ID then they are not logged in
 $smHomepageSidebar = '<div style="padding-bottom:10px;">';
 $smHomepageSidebar .= get_option($optionString); //cp_ads_welcome_msg
 $smHomepageSidebar .= '<div style="float: right; text-align: center;">';
 $smHomepageSidebar .= '<a href="' . get_option('home') . '/wp-login.php">' . __("Already a Member?", 'cp') . '</a><br />';
 $smHomepageSidebar .= '</div>';
 if (get_option('users_can_register') || get_blog_option($blog_id, 'users_can_register', 0))
 $smHomepageSidebar .= '<a href="' . get_option('home') . '/wp-login.php?action=register">' . __("Join Now!", 'cp') . '</a>';
 $smHomepageSidebar .= '<br />';
 $smHomepageSidebar .= '</div><!-- /dotted -->';

 //Create the Login Form
 $smHomepageSidebar .= '<div style="margin-top: 10px;">';
 $smHomepageSidebar .= '<form action="' . get_bloginfo('url') . '/wp-login.php" method="post">';
 $smHomepageSidebar .= '<label style="font-size: 11px; margin-left: 1px;" for="log">Username: <input type="text" name="log" id="log" value="' .  wp_specialchars(stripslashes($user_login), 1) . '" size="11" style="height: 10px; font-size: 10px;" /></label>';

 $smHomepageSidebar .= '<label style="font-size: 11px; margin-left: 1px;" for="pwd">Password: <input type="password" name="pwd" id="pwd" size="11" style="height: 10px; font-size: 10px;" /></label>';
 $smHomepageSidebar .= '<input style="font-size: 11px; margin-left: 1px;" type="submit" name="submit" value="Login"  /><br />';
 $smHomepageSidebar .= '<label style="font-size: 11px; margin-left: 1px; vertical-align:baseline; line-height: 2.1em;" for="rememberme"><input  style="margin: 0; position: relative; top: 3px;" name="rememberme" id="rememberme" type="checkbox" checked="checked" value="forever" /> Remember me </label>  | ';
 $smHomepageSidebar .= '<a style="font-size: 11px; margin-left: 1px;" href="' . get_bloginfo('url') . '/wp-login.php?action=lostpassword">Recover password</a>';
 $smHomepageSidebar .= '<input type="hidden" name="redirect_to" value="' . $_SERVER['REQUEST_URI'] . '"/>';
 $smHomepageSidebar .= '</form>';
 $smHomepageSidebar .= '</div>';
 }
 return $smHomepageSidebar;
}
Now that you have this function in your functions.php file, upload it to your child theme directory and your done with Step 3. Now it doesn’t seems like we have really accomplished anything, and that’s because this is a NEW custom function. So its not yet being called anywhere on the website. In Step 4 we will modify the sidebar.php page to use the new dynamic welcome widget function we just created.
Step 4: Modify the sidebar.
To modify the sidebar.php file, or nearly any other file in the ClassiPress root directory, you simply COPY the file and PASTE the file into your child theme. Thus, your child theme will be a set of files that identify which pages you have modified. So open your ClassiPress theme directory, find the sidebar.php file and copy it. Now go to your child theme directory and paste the sidebar.php file there. Your should now have 3 files in it:
- functions.php
- sidebar.php
- style.css
Now open the new sidebar.php file located in your child theme directory. In case versions change, do a search for the following:
<?php echo get_option('cp_ads_welcome_msg'); ?>

<a href="<?php echo get_option('siteurl'); ?>/wp-login.php?action=register"><?php _e('Join Now!', 'cp') ?></a>
When you find it we want to replace it with our new function. Replace infers that you ERASE the above code, and the place the new function in its place. Copy the code below that we are providing to make things simple for you, and place it in the spot where the above code USED to exist.
<?php
 if(function_exists('cp_dynamic_welcome_widget')) echo cp_dynamic_welcome_widget('cp_ads_welcome_msg');
 else  echo get_option('cp_ads_welcome_msg');
 ?>
So what did we just do?! Well, we replaced the normal widget you see on the homepage sidebar that says “join now” and some text that you specify in the ClassiPress settings. The function is still pulling your custom text setting you have customized for your site, but now uses it in our new function we created in the functions.php file. The exact specifics of how we created the function is outside the scope of this project, you may want to brush up on your PHP techniques if you want to write your own functions later.
Finally, we upload the sidebar.php file to the server so that your server child theme folder now has the 2 files we referenced at the beginning of this step. If you followed the tutorial correctly you should have a new dynamic widget on your homepage. In order to experience it fully, make sure you “logout” before you preview the homepage and the new sidebar widget.
This concludes Part 2 of the child theme tutorial. Make sure you stay tuned into the blog as Part 3 of the series is already underway and will feature steps explaining how to setup a favicon, build new “template pages like a new dashboard, load up new script files in the header and more!